Q: I DON'T UNDERSTAND HOW TO MAKE THEM!
A: Follow the instructions on the top
page, but also take a look at the
following diagrams:
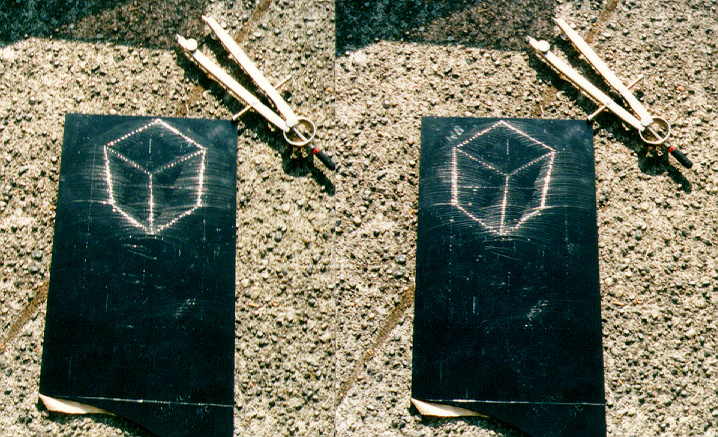
![[Click to download GIF]](/amateur/holo1a.gif)
1. Make curved scratches as shown above
Your first hologram should be something very simple. How about the letter
"V."
First draw the little "V" as a guide. Draw it near the bottom edge of
your piece of plastic. Next, use the dividers to make lots of curved
scratches above the "V". For each scratch, place the point on a different
spot on the "V." Each scratch should be a quarter-arc or even a
half-circle. Don't change the distance between the metal points.
Make about twenty scratches. Even more is better.
![[Click to download GIF]](/amateur/holo1b.gif)
2. Make LOTS more scratches on the plastic plate
Each scratch will create a single glowing dot in the finished hologram.
That means you should make lots and lots of curved scratches. If you just
make a
few scratches, your hologram will look like a collection of sparks. If
you make enough scratches (spaced closely like the grooves of a vinyl
record album), the rows of sparks in the hologram will start to look like
glowing white lines.
IMPORTANT NOTE: Each scratch must look dark and shiny. If they
look white
and
dusty, then your hologram won't work. If the sharp point of the compass
makes a squeeking noise, then that scratch is useless. Make your
scratches slowly, so the compass point doesn't squeek.
![[Click to download GIF]](/amateur/holo1c.gif)
3. Cut the little picture off the bottom of the plate
The scratches ARE the hologram. If you wish, you can cut your little "V" drawing off the bottom of the plastic plate. If people only see the plastic plate with "sandpaper marks", they won't know what the picture looks like until they see the actual holographic image.
Q: I TRIED IT AND IT DIDN'T WORK!"
A: If your hologram doesn't work, the problem could be from three main
sources: the illumination, the viewing angle, or the hologram itself.
A) ILLUMINATION PROBLEMS
Holograms are sometimes hard to view, so at the start, USE SUNLIGHT OUTDOORS. The bright light will make your holographic image easy to recognize. If sunlight is lacking, then use an overhead street light outdoors at night. The dark background and the small bright light source gives good results. Once you know that your holograms are working and you can see them under sunlight, you can try bare lightbulbs indoors. Even flourescent tubes will work somewhat if you stand so the tube is lined up perpendicular to the hologram. But avoid light bulbs and flourescent tubes at the start, they make the hologram too hard to see.B) PROBLEMS WITH VIEWING ANGLEWhen illuminating holograms indoors, avoid using a bulb in a fixture that has a white reflector, or one that is very close to the white ceiling. These will make the hologram image blurry. The ideal light source will look like an intense pinpoint having a black background. A small clear lightbulb hanging from a wire in a darkened room is best. If your only lamp has some sort of reflector, you might consider painting the reflector black. A frosted bulb will work OK if it is about 5 ft or more from your hologram. A transparent light bulb is preferred. Halogen pin-spots (used in track lighting) work very well.
These holograms work best when the reflected background is dark, so try shading the windows and turning off all room lights except the one used for illumination, or try viewing them at night. This isn't a requirement. However, a dark environment makes the holograms appear to be VERY bright.
Stand so you are facing the light source, or with the light source directly overhead. (If the light source is behind you, your hologram will only operate over a very small range of viewing angles, and the correct angle might be hard to find.)Hold the hologram so the scratches are humped upwards in the center. If you hold it so the scratches are bowl-shaped (humped downwards) then the image will be upside down, and the depth will be inside-out!
While looking at the scratches, tilt the top edge of the hologram slowly farther away from you and slowly back again until you start seeing bright highlights in the scratches. Try tilting the hologram until you see the reflection of the light source in the plastic surface, then tilt it back again so the light source image appears to move up a few inches above the scratches. You should see a collection of highlights in the scratches. These highlights ARE the holographic image.
If you still cannot produce a hologram, then as a last resort, try drawing a single circular scratch on plastic like so:
            ___----___
          /            \
        /                \
       |                  |
      |          .         |
      |                    |
       |                  |
        \                /
          \            /
            ---____---
Hold this scratch in the sun, and you should see two little highlight reflections which move around along the scratch. The highlights will be on opposite sides of the circle, like so:
         ___----___     two little
       /            \    highlight
     /               (O)  reflections
    |                  |
   |          .         |
   |                    |
    |                  |
    (O)               /
       \            /
         ---____---
C) FAULTY HOLOGRAMThese little reflections ARE THE HOLOGRAMS. They are holograms of a single dot. When you make a complete hologram plate, every single scratch should have a little highlight when you hold the plastic plate in the sun. The little dots of highlight-reflections form the hologram (of the letter V, for example.)
If you don't see these little moving reflections, then there is something wrong with the scratch. You may have pressed too hard with the compass point, or swept the point along too fast and produced a white scratch with a shredded internal surface. Or your compass may be too wobbly, since the scratched line must be very straight and smooth. If it has little wiggles, it won't produce holographic images.
Use a sturdy, expensive compass. I tried the $2 kind, and it didn't work. It wobbled and changed spacing. A drafting compass from an art supply store works best. Expect to pay between $10 and $15. It must have a screw adjustment which sets the spacing between the points. It must have an extra metal point which can be put in place of the pencil lead in order to change the compass into "dividers." When set to a particular spacing, you should feel no "play" or wiggling if you try to move the compass arms together and apart. [WARNING! Always verify that the second metal point can actually be clamped in place of the pencil! I've encountered compasses where the supplied metal point was the wrong size and could not be used. ]Draw one object, and LOTS of circular scratches, from lots of points on your object. For example, if you were to only draw scratches from the tips of the letter "V", your hologram would appear as three glowing dots, and would be very hard to see. Instead, draw the scratches with your compass placed upon at least nine different places spread across the "V." The more scratches, the more dots will be in the final hologram.
Use a sturdy plastic plate, like a piece of Plexiglas 1/16in thick or thicker. I found that polycarbonate "Lexan" works a little better than acrylic because the plastic is softer. Someone recently had good success using the clear plate that came with a small picture frame. The clear styrene front of CD boxes works well (and some have a black back, which gives good contrast. For your first hologram try to get some acrylic or polycarbonate (Plexiglas or Lexan.) Try other materials later, once you succeed in producing holograms.
DRAW YOUR CIRCULAR SCRATCHES VERY LIGHTLY to start. Once you have succeeded in producing good holograms, you can try drawing deeper scratches. Deeper circular scratches produce a brighter hologram. But if they are a bit too deep, the surfaces inside the scratch will be shreeded and rough, and the hologram won't work. The scratch MUST be black and shiny inside.
DULL COMPASS POINTS WORK BETTER. If you compass is new and unused with extremely sharp points, then you MUST push down very lightly when making scratches. If you push down too hard, the sharp point will create a groove with a flat-sided cross section, or will tear up the plastic into shreds. Instead your goal is to make scratches which have a rounded-bottom cross section. Try dulling the sharp points on 300 or 600 sandpaper. Also, I found that sewing machine needles work well (they have an intentionally rounded tip.) Even small nails sometimes work well. If your compass needle is too sharp, then shallow scratches will work, but deep ones won't.
AVOID MAKING WHITE, DUSTY SCRATCHES, as these will not reflect light and will not produce hologram dots. If you sweep the compass point too fast, or if you push it down too hard, it may chatter and produce a dusty, non-functioning scratch. If you make a couple white scratches by accident, don't sweat it. If *most* of the circular scratches are white, then start over.
Avoid squeaks! If the compass needle makes a squeaking or hissing sound as you scribe each scratch, then that scratch won't reflect light right. Each scratch must be smooth inside like a mirror. Scribe your scratches SLOOOOWLY to avoid squeaks. Rub a very tiny bit of oil on your plastic plate, it helps.
                     /          /
      Tilted       /          /
      compass    /          /
      point    /          /   (Side View)
              --__      /
               /  /--_/       Direction
              / /       ----> of Motion
             //           ---->
 ___________/______________________
|              plastic plate       |
|__________________________________|
|
Try holding the compass tilted, so the point trails across the plastic and doesn't dig in and bounce.Start with a very simple image, like a "V" or "I" or "X" Once you get this working well, you can scratch your initials, etc. If you start out with something complicated, you may do a lot of work yet have your first attempt fail. It's better to do your trial-and- error with quick and simple images.
It's easier to see holograms having shallow virtual depth, so set your compass to about 1 or 2 inch spacing between the points. The first scratch-hologram I ever made was at *fourteen* inches depth! It was *very* hard to see, and fortunately I knew exactly how to illuminate and view it, or I never would have seen the image.
Compass point too sharp? The scratches function as reflectors having curved cross-sections, so if your compass doesn't make polished scratches with curved bottoms, your hologram won't work. If your compass point is extremely sharp, then sweep it with low pressure, otherwise it will create a deep v-shaped scratch which won't reflect light properly. To make a bright hologram, use a less sharp compass point with heavier pressure when making the scratch.
Q: WHAT IS THE THEORY BEHIND THIS?
A:
See my SPIE Paper for detailsThe brief explanation: curved scratches reflect light as if they were thin, bent, silvery rods. When we view them in the sun, each scratch will both focus and also spread the sunlight (depending on viewing angle, each scratch can produce either a "virtual image" or a "real image" of the sun.) We can build a hovering, three-D shape by using thousands of scratches, each producing a tiny hovering image of the sun.
Another: these aren't normal off-axis holograms. Instead, they are Benton Rainbow white-light holograms. Benton holograms are wavelength- independent. I realized that this requires that the interference fringes must be size-independent. If the spacing between zoneplate fringes is increased, the 3D image is still reconstructed. (But the rainbow-colored artifact turns white.) The fringes of a Benton hologram could be several mm apart, and the hologram would still work! Or instead, we could delete all but one fringe, leaving some conic-section curves, one for each object-pixel. Rainbow holograms are weird.
Another explanation: each scratch acts as a bent mirror and reflects sunlight. Each reflection looks like a small white highlight on the shiny scratch. Each of your eyes sees a DIFFERENT REFLECTION. Your brain thinks the two different reflections are really one white dot located deep behind the scratch. It's like a "viewmaster" stereo viewer!
When you draw lots of scratches, each of your eyes sees a different pattern of dots, with one white dot per scratch. Because your two eyes see different patterns, your brain can mix the two images together and make a 3D structure in your mind. The two images are called a "stereo pair."
For each scratch, the more curved the scratch, the closer the two dots appear to be. When they are close together, your brain thinks the one white dot is closer to the plastic surface (it has shallower depth.) If the scratch is broad and sweeping, then the two dots will appear far apart, and your brain will think the one white dot is very deep behind the plastic.
Here's a less-brief explanation: holbrief.html
Here's a paper I presented at a conference: DRAWING HOLOGRAMS BY HAND at SPIE Electronic Imaging 2003The full explanation is contained in this research paper:
W. Plummer & L. Gardner, Applied Optics, V.31 No.31, Nov. 1992, pp. 6585-6588, "A mechanically generated hologram?"More info is here: IS IT REALLY HOLOGRAPHIC?Info about Benton's Whitelight/Rainbow holograms is in this paper:
F. S. Yu, A. Tal, H. Chen, Optical Engineering, Vol.19 No.5, pp. 666-678, "One-step rainbow holography: recent development and application."