DIY REPAIRING THE LIVESCRIBE®
Echo®
PEN
2015 W. Beaty
I've not been able to find any repair service for these pens. Will
Livescribe even sell the internal replacement parts?
But I have a couple of these pens, and have managed to keep one alive for
many years longer than normal.
- Won't charge, connector problem
- Display lasts 5yrs, then rapidly dims
- Battery holds only minutes charge, not hours
1. CONNECTOR PROBLEM
The first one is a big DOH! These pens get jammed with
lint! Same problem as connectors on iPod etc. It's worse if you
carry it around in a pocket.
Solution: look closely at the microUSB connector, use a
magnifier if
necessry. You'll probably find that the bottom of the cavity is packed
with belly-button lint. Get a needle or fine wire (resistor lead) and
carefully drag out the clotted debris. Turn it upside-down so particles
fall free, and blow hard into it. Once cleaned, the connector should plug
all the way in. (I also pulled out a wad of lint from the headphone jack
using long tweezers. It was nearly the size of a Q-tip end!)
2. O-LED DISPLAY IS DIM/DARK
These displays have a backstory. OLEDS have limited life, then
they rapidly degrade in brightness. Maybe the modern 2015 expensive ones
last longer than five years? But the earlier ones don't. Many
Livescribe pens contain the old ones. If you notice the display dimming
on yours, be prepared to see it rapidly dim out to nothing over a few
months. If observed under a strong enough microscope, we find that each
pixel is covered with microscopic black spots which continuously grow.
Once they've filled half the area, the black-spot borders are very large,
and the rate of progressive dimming becomes very fast. Black Spot
Disease! (A separate disease from black-spot progressive failure in
LED junctions.) If you notice dimming, then only weeks remain before
the spots all join together and take over the entire pixel.
Solution: dissect the entire pen and solder in a new display.
I found that this isn't impossible, since you can occasionally find dead
pens with
working displays on eBay for under $20. Get the ones with stuck CPU error
displayed at power up. (Maybe you should buy one or two
right now, "parts pen," for future replacements!) Perhaps avoid the ones
with dark displays. They might just have a dead CPU, or bad battery or
connector? Or maybe they're working fine, but old, with totally black
failed displays.
Note that so far there are no 96X18 pixel displays to be found.
Livescribe Inc. must have had a run of custom-order OLED panels
manufactured.
SCAM WARNING: MANY PENS ON EBAY HAVE FAILED OLEDS, BUT BEING SOLD AS
"AS-IS, WON'T POWER UP." They actually work just fine, but the display
is dead.
|
QUICK TEST FOR "ECHO" PENS: While watching the pen's display, plug it into laptop/desktop via micro-USB cable. The display should briefly show "LIVESCRIBE," and then will display the current time and a small battery-symbol. (If not, then dead pen, or perhaps just dead display.) The laptop USB should 'recognize.' If it does, and the display remains dark, then probably the display has failed. Next, disconnect the pen from the charging cable, and press the button once to shut it down. Take it into a very dark room. Press down the power button and hold it for about ten seconds. The display should immediately show "LIVESCRIBE" for one second, then darken again as you continue to hold down the button. (Can you see it, very dimmly? If so, display is dim/bad.) After five seconds, you should hear a chime-sound and the pen begins recording audio. Immediately release the power button. Pen is in sound-recording mode. Next press the button once briefly, and the pen plays another chime-sound and halts recording, then powers-down. If these chimes are heard, but the OLED display remains dark, then the pen is working, but the display has failed. |
- Dead Livescribe pen (which contains a working OLED display.)
- Your good Livescribe pen (which contains a dead OLED display.)
- T5 Torx screwdriver (tiny, 1/2mm, or use SD5.5, or tiny spline)
- Various small/tiny flat-tip screwdrivers for prying
- Tiny bottle to prevent loss of tiny screws
- Fine-tip soldering iron (variable-temp suggested)
- Thin lead-based solder (NOT high-temp lead-free!)
- Tweezers for pulling up flat cable
- Magnifier for close work
- Solderwick and flux for cleaning the pads
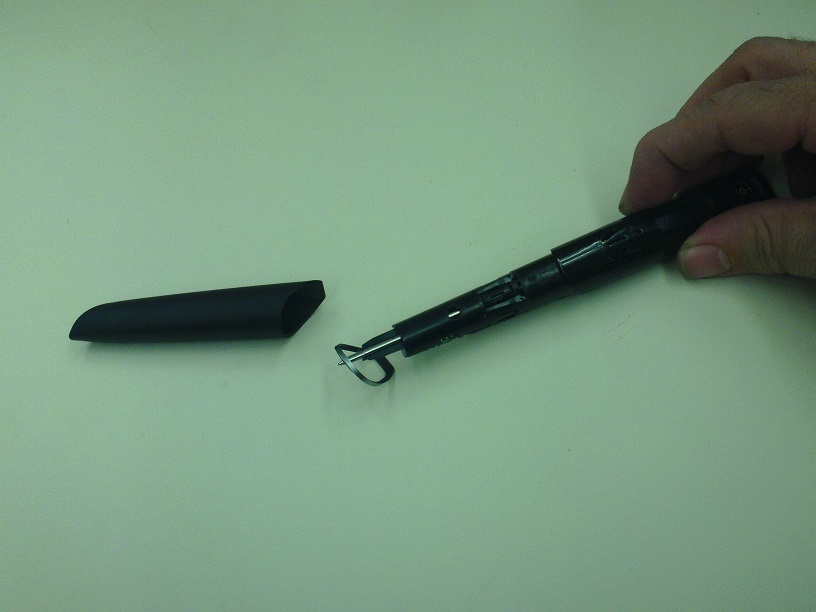
The secret to disassembly is simple: the entire front of the ECHO pen is a plastic glove which slips off.

NOTE, leave the ink cartridge installed
before trying this. Just grab the two halves and pull. The
front of the pen pops off. (It's VERY tight on new pens, loose and
cracked on older ones.)
There's also a tilted plastic silver ring to remove, don't let it fall
and get lost.
(If the ink cartridge was missing, then the small black cylindrical
cartridge-grabber inside the pen will promptly fly across the room.
Don't lose that part!)
With the "glove"
cover removed, spin the ink cartridge and you'll see
the little black/clear cylinder which holds it in. Pull the cartridge,
remove and store the little black cylinder so it's not lost.

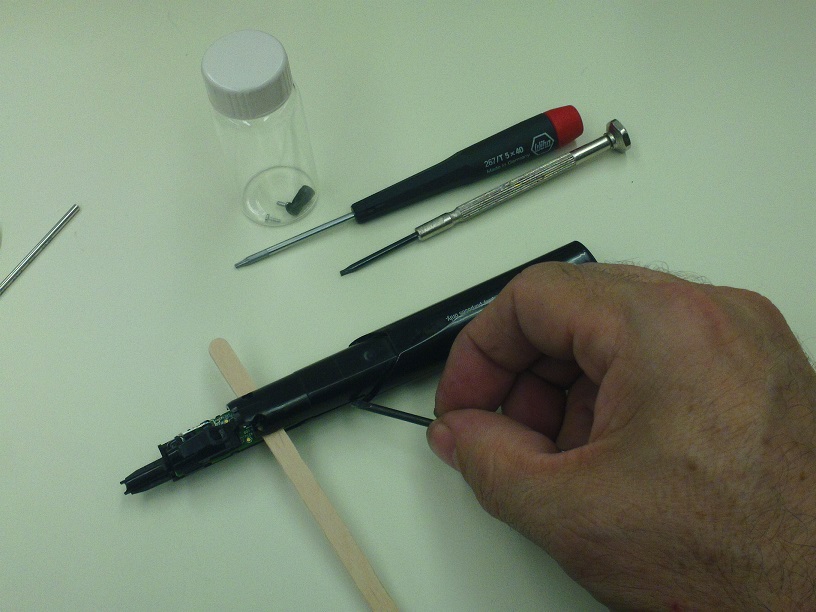
Notice the two Torx screws inset in small wells. They hold down the
end of the entire remaining half-shell, plus six internal snap-hooks
between the plastic shells along both sides, plus a tab at the headphones
end. Remove and safely store the screws.

Note the "pry slots" on either
side of the case near the screws. I found that I could pry up the
'screws-end' of the plastic shell by a couple mm, then slip tiny
screwdrivers progressively along the crack on both sides, prying up the
front shell as I went.
PRY THE EDGES OF THE BOTTOM SHELL OUTWARDS, since
the hooks are part of the top of the pen. This unsnaps the first pair of
internal hooks,
then I lift and pry to unsnap the next pair and the next.
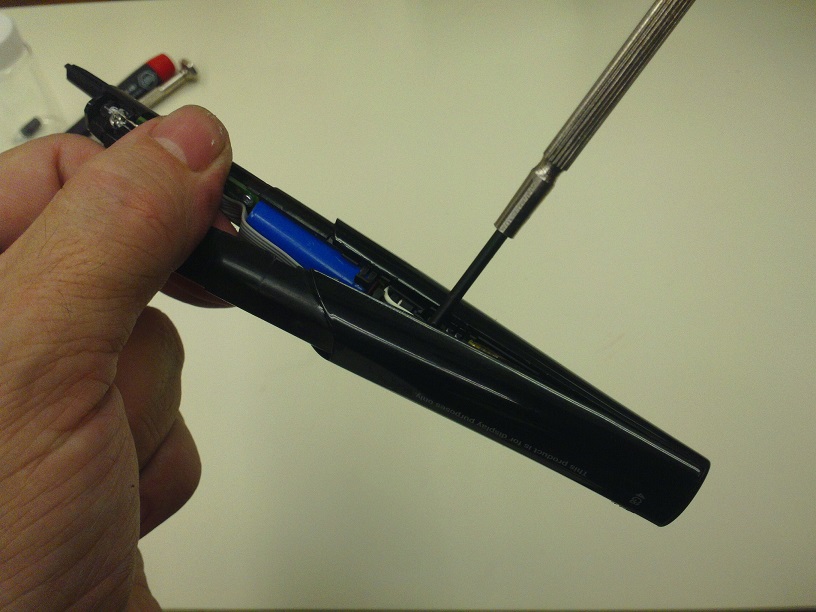
There's a trick
to it, so go slow to avoid snapping off the plastic hooks. (Heh, it helps
to be repairing the clear-shell 2010 version of Echo, the
transparent edition where the internal hooks are visible!)

With the top shell gone, two more identical screws are exposed.
These hold down the camera pcb. Remove and store these.
Lift the camera pcb and cable, then carefully pull the battery from between the hooks on either side. This exposes the black cylindrical loudspeaker assembly. The loudspeaker is held into the pen shell with adhesive foam tape, and it also holds the entire pcb assembly in the bottom shell. Carefully pry the loudspeaker and foamtape loose from the pen, and then you should be able to remove the processor board as well. Finally, remove the loudspeaker from the end of the display assembly. It's attached with two plastic hooks and a dab of sticky goo down in the cleft. Lift the hooks and pull slow and continuous to peel it free.
[Oct 2015 MORE TO COME, PLUS PHOTOS/VIDEO but
see some guy's Vimeo for now]
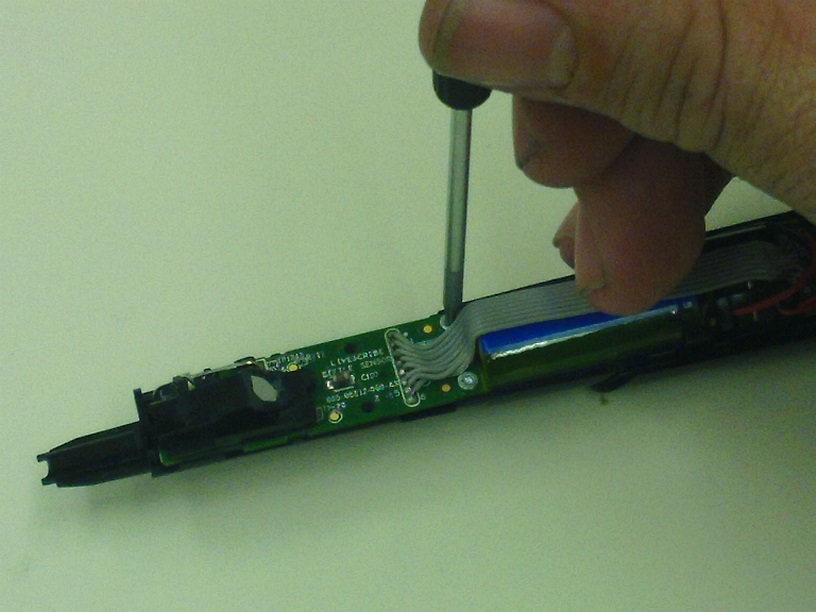
![[closeup of 1cm kynar ribbon soldered to tiny pc board, ten pads spaced 1mm apart]](/graphics/echopen/penribn4A.jpg)
|
The glass OLED display is permanently glued to a small plastic carrier
clipped to the processor pcb. On this carrier, locate the four plastic
hooks at corners; the little ones holding it against the main processor
PCB. Pry these away with a tiny flat screwdriver. When it's loose you'll
find that the display is connected by a flexible Kynar pcb-strip
soldered to the main pcb. Your task is to de-solder this strip. I use
tweezers and a fine-tip iron to melt each of the ten pads in sequence,
lifting gently with tweezers.
Next use
fine solderwick and a little flux to clean up the PCB solder-pads. I
didn't bother to clean the Kynar-strip pads, just the PCB. Then, solder
in the identical display assembly removed from a CPU-crashed pen. To
avoid getting the cable flipped around backwards, first mark the upper
surface of both display cables at the solder end. It helps greatly to use
tweezers rather than fingers, unsoldering each pad and lifting up one edge
of the cable as you go. Note that the solder pad at one end goes to the
PCB ground layer, so that one takes extra heat. (Unsolder the red/black
microphone wires as well, and note that the red wire has the little arrow
on the pcb pad.)
WARNING! This thin ribbon cable is Kynar plastic, and can be
burned/warped by soldering temperatures. Kynar is high-temperature
plastic, but can still be destroyed by a too-hot iron and slow crude
soldering skills. One trick: adjust your temp-control soldering iron so it
barely melts lead-free-solder. Then, add tin/lead solder to each of the
small solder blobs holding the cable down. This greatly lowers the
solder-melt temp, allowing you to turn down your tip temperature even
more.
Before reassembling, don't forget to clean any built-up filth the pen
shells, especially cleaning the inside of the display window. Wipe off
any finger prints from the glass display. And make sure there's no
fingerprints or bits of lint left on the plastic shell's front camera
window.
3. BATTERY
Battery is a lithium cell 3.7V, 250mAH, ICR12300, 28mm x 11mm, "Great
Power" brand, also "Unitek".
On Aliexpress search for this:
3.7v 12300
More to come...