|
|
|
|
CONSTRUCTION
PARTS:
valve from El. Goldmine, Surplus Shed (need vise-grips) Also: other sources of wire
|
|
CONSTRUCTIONPARTS:valve from El. Goldmine, Surplus Shed (need vise-grips) Also: other sources of wire |
   ___________________________________________________________________
  |       8cm      | 3.5cm  |       8cm       | 3.2cm |      7.7cm    |
  |                |        |                 |       |               |
  |                |        |                 |       |               |
  |                |        |                 |       |               |
  |8               |        |                 |       |               |
  |cm              |        |                 |       |               |
  |                |        |                 |       |               |
  |                |        |                 |       |               |
  |                |        |                 |       |               |
  |                |        |                 |       |               |
  |________________|________|_________________|_______|_______________|
NOTE: this page must be displayed in COURIER FONT, otherwise
       _____8_________
     _|______________ \
    |\      7.7      | \ 3.5
    | \3.2           |  \
    |  \_____________|___\
    |  |         8        |
    |  |                  |
    |  |                  |
    |  |                  |
    |  |                  |
    |  |                  |
    |  |                  |
    |  |                  |
    |  |                  |
     \ |                  |
      \|__________________|
Fold it as above and tape it securely
        ________________
      _|_______________ \
     |\                | \
     | \               |  \
     |  \______________|___\
     |  |                  /|
     |  | \              /  |
     |  |   \          /    |
     |  |     \  (hole)     |
     |  |       \   /       |
     |  |         O         |
     |  |       /   \       |
     |  |     /       \     |
     |  |   /           \   |
      \ | /               \ |
       \|___________________|
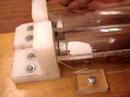
Use the nail to poke a hole perfectly straight through the center of the box, going through both sides and all three layers of cardboard. Then pull the nail out and use it to widen all the holes slightly, so when you put the nail back through, it will be a bit loose and able to spin. ( You can find the exact center by using a ruler to draw an "X" from the corners. ) |
[YES, you can build a plexiglas box instead if you wish. However, don't make it any larger than this. The wire must stay very close to the spinning magnets, so keep the box as small as possible. It should be slightly more than 3 in. wide and slightly more than 1 in. thick.] |
         _______________
       _|______________ \
      |\               | \
      | \              |  \
      |  \_____________|___\
      |  |                  |
      \  |                  |
      \\ |                  |
      \\\====================|
      \\\====================/__
      |\\====================/  \
   ---+-\====================/   \
  /   |  ====================     \
 /    |  |                  |      |
|      \ |                  |      |
|       \|__________________|      |
|
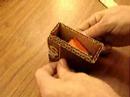
Pick the spool of number-30 magnet wire from
the kit of spools. This is the thinnest.
Tape one end of the number-30 magnet wire
to the side of the box, then wind all of the
wire onto the box as shown. This gives 250
turns. It's OK to cover up the nail hole.
Pull the taped end of the wire out, then
tape down both of the wires so the coil
doesn't unwind. You should have about 10cm
of wire left sticking out.
Use sandpaper or the edge of a
knife to scrape the thin plastic
coating off 2cm of the wire ends.
Remove every bit of red coating,
so the wire ends are coppery. |
(note: the five lines of wire shown above are not real,
that's the 'equals signs' I used for drawing.
The real wire can just be wound up in a big wad in the center of the cardboard box.)
        _______________
      _|______________ \
     |\               | \
     | \              |  \
     |  \_____________|___\
     |  |                  |
     \  |                  |
     \\ |                  |
     \\\====================|
     \\\========---=========/__
     |\\========(\\)========/  \
  ---+-\==========(_)=======/   |
 /   |  ====================    |
|    |  |                  |    |
|     \ |                  |    |
       \|__________________|    |
Spread the wire away from the
nail hole and tape it in place.
Stick the nail back through the
holes and make sure it can spin.
Take your four magnets, stick
them face to face in two pairs,
Then stick the two pairs inside
the box and on either side of the
nail so they grab the nail. Push
them around until they are some-
what balanced and even, then spin
the nail and see if they turn
freely. If you wish, you can
push 2cm squares of cardboard
between the magnets to straighten
them. If you wish, tape the
magnets so they don't move
around on the nail.
|
        _____ magnets
       |_____|
       |_____|
=================|| NAIL
       |_____|
       |_____|

    SIDE VIEW OF THE
    NAIL AND MAGNETS
_____________ |_____________| 2 magnets |_____________| ______O______ |_____________| 2 magnets |_____________| VIEW FROM THE END |
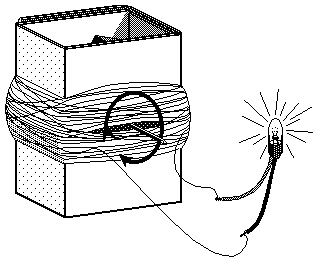
TWIST THE WIRES TOGETHERMake sure that each end of the generator's wires are totally cleared of red plastic coating. If there is a bit of plastic left, it can act as an insulator which turns off your light bulb circuit.Twist the scraped end of each generator wire securely around the silver tip of each wire from the small light bulb. (If necessary, use a knife to strip more plastic from the ends of the light bulb wires.) One generator wire goes to one light bulb wire, the other generator wire goes to the other light bulb wire, and the two twisted wire connections should not touch together. In the twisted wires, metal must touch metal with no plastic in between. |
           _______________
         _|______________ \
        |\               | \
        | \              |  \
        |  \_____________|___\
        |  |                  |
        \  |                  |
        \\ |                  |
        \\\====================|
        \\\========---=========/___
        |\\========(\\)========/   \
   -----+-\==========(_)=======/    \
  /     |  ====================      |
 |      |  |                  |      |
 |       \ |                  |      |
 |        \|__________________|      |
 |                                   |
  \                                  /
   \                       twist    /
    \      {} twist          {}    /
     \     {}                {}   /
      \____/\______   _______/\__/
                   \_/
                   ( )
                   ( ) tiny
                   (_) light bulb
| |||||||||||||||
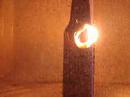
TEST ITSpin the magnet REALLY fast and the bulb will light dimly. If it
doesn't work, try spinning it in a dark room so you don't miss the dim
glow. If needed, adjust the position of the magnets so they don't hit or
scrape the cardboard. This thing has to spin *fast*, and if the magnets
whack the cardboard and slow down, you won't see any light. Spin it
faster than eight revs per second. (IF IT DOESN'T WORK, SEE "DEBUGGING")
Once you get it to work, try clamping the point of the nail into the chuck
of a hand-crank drill. Spin the magnets fast with the drill and the bulb
will light brightly. Don't go too fast or you'll burn out the bulb, or
maybe fling magnets all over the room. You can try this with an electric
drill as well, although electric drills don't spin as fast.
Note: your generator produces Alternating Current, not Direct Current.
The output voltage is about 2 volts max, so there is no electric shock
hazard at all.
NEXT: HOW IT WORKS
(PREV: UP TO TOP) |